Connecting machines
A machine in GRBL Server is any supported controller you've registered with the server. Each machine has a name, a transport (how it's wired — USB serial, Wi-Fi, or raw TCP), a protocol (the firmware family it speaks — GRBL, GRBL-ESP32, Marlin, Smoothieware, Klipper, or generic G-code), an endpoint (a COM port for USB machines, or an IP address for networked ones), a description, a working area, and a connection status.
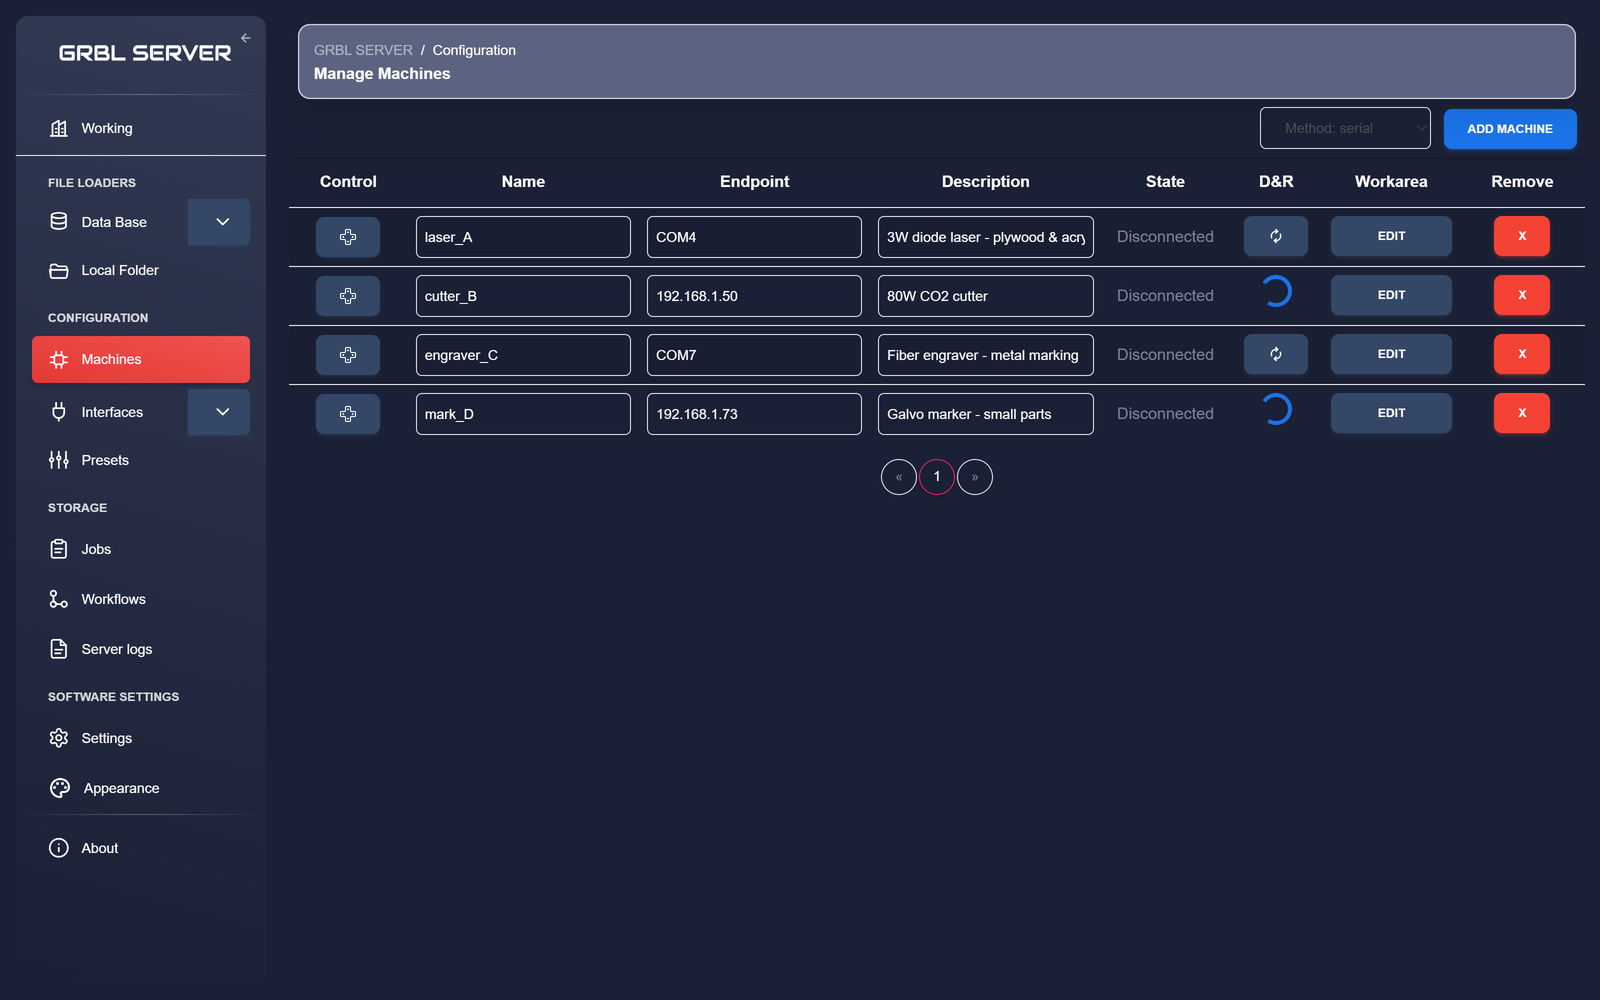
This page shows you how to add machines over each transport, which firmwares are supported, what the working area means, and how to read the status indicators.
Transports & protocols
Registering a machine comes down to two choices: how it's connected (the transport) and what firmware it runs (the protocol). You pick the transport first, and GRBL Server then offers only the protocols that make sense on it — so you can never select an impossible pairing.
Transports — how the machine is wired
| Transport | Used for | What you enter as the endpoint |
|---|---|---|
| USB serial | Controllers plugged into the host over USB. | The COM port — COM3, COM4, … |
| Wi-Fi (WebSocket) | ESP32-based GRBL/FluidNC controllers reachable over the local network. | The controller's IP address — 192.168.1.50 |
| TCP | Controllers that expose a raw socket / telnet port — Smoothieboards, Klipper hosts (via Moonraker), ser2net bridges, network-connected Marlin/GRBL. | The host's IP address — 192.168.1.50 (the port is set separately, see below) |
Protocols — the firmware it speaks
The protocol decides how GRBL Server frames commands, reads status, and runs a job. Pick the one that matches your controller's firmware:
| Protocol | Typical hardware | Transports | How jobs run |
|---|---|---|---|
| GRBL | Classic GRBL boards (Arduino/AVR, GRBL 1.1). | USB serial, Wi-Fi, TCP | Streamed line by line |
| GRBL-ESP32 (WebUI / FluidNC) | ESP32 GRBL / FluidNC controllers with the WebUI. | Wi-Fi | Uploaded, then run from the controller |
| Marlin | Marlin 3D-printer / CNC boards. | USB serial, TCP | Streamed line by line |
| Smoothieware | Smoothieboard and clones. | USB serial, TCP | Streamed line by line |
| Klipper (Moonraker) | Klipper hosts reached through the Moonraker API. | TCP | Uploaded, then run as a print |
| Generic G-code | Anything line-based that speaks plain G-code with ok acknowledgements. | USB serial, Wi-Fi, TCP | Streamed line by line |
Adding a USB-serial machine
- Plug the controller into the host computer over USB.
- If the board uses a CH-340 USB-to-serial chip — most cheap GRBL boards do — and Windows hasn't loaded a driver for it, download and install the CH-340 driver from the chip maker's official driver page first. Without the driver the board won't show up as a COM port.
- Click Add Machine. The Add a machine page opens.
- Step 1 · Connection. Set Transport to
USB serial. The Protocol picker fills with the compatible firmwares —GRBL(the default),Marlin,Smoothieware,Generic G-code. Pick the one your board runs. - Step 2 · Connection parameters. Set the Baudrate the firmware was configured for — most GRBL boards ship at
115200; Marlin and Smoothieware are often250000. Each machine stores its own baudrate, so this only affects the boards you add now. - Step 3 · Find your machines. Click Scan now and GRBL Server lists every board it finds on the host's COM ports (boards you've already added are left out). If a board isn't listed, type its COM port (e.g.
COM3) into the endpoint box and click Find by endpoint. - Tick the checkbox next to each board you want to add. The Endpoint and Identifier (the board's USB serial number) are filled in for you.
- Give each board a short, descriptive name (e.g.
laser_A) — this is what shows up in workflows and job records — and edit the description if you like (e.g. "3W diode laser · plywood + acrylic"). - Click Add selected machines. GRBL Server connects to each board, reads its working area from the controller, and adds it to the machines table.
Adding a Wi-Fi machine
Most Wi-Fi GRBL controllers are built around the ESP32 chip, which can run as either a Wi-Fi access point or as a client on an existing network. For GRBL Server to detect and talk to the machine, the controller must be in STA mode (Station mode) and joined to the same local network as the host computer.
Switching the controller to STA mode
The exact procedure depends on which firmware your controller runs (GRBL_ESP32, FluidNC variants, vendor-specific builds, etc.), but the shape is the same:
- Power on the controller and connect to its AP-mode Wi-Fi from a laptop or phone (it usually appears as something like
GRBL_ESP32-XXXX). - Open the controller's web UI (typically
http://192.168.4.1). - Find the Wi-Fi / network settings page.
- Change the mode from AP to STA (or "Station", "Client", depending on the firmware).
- Enter the SSID and password of your workshop Wi-Fi.
- Save and reboot the controller. It should now join your network and get an IP from your router.
Check your router's client list (or use a Wi-Fi scanner app) to find the IP it received. A static DHCP reservation makes future life easier.
Registering the controller with GRBL Server
Once the controller is on your network, registering it follows the same Add a machine page as a serial machine — you just pick a different transport.
- Confirm the controller is reachable from the host: open
cmd.exeand runping <controller-ip>. If ping fails, fix that first — the controller is still in AP mode, or on a different SSID, or blocked by client-isolation on the AP. - On the Manage Machines page (Configuration → Machines), click Add Machine.
- Step 1 · Connection. Set Transport to
Wi-Fi (WebSocket). The Protocol picker offersGRBL-ESP32 (WebUI / FluidNC)(the default), plainGRBL, andGeneric G-code. - Step 2 · Connection parameters. The WebSocket port defaults to
81, which is what ESP3D / FluidNC / GRBL_ESP32 boards use. Change it only if your firmware serves WebSocket on a different port. - Step 3 · Find your machines. Click Scan now and GRBL Server sweeps your local network for controllers, listing each one with its IP address and identifier. The scan takes a few seconds. If your controller isn't listed, type its IP address into the endpoint box and click Find by endpoint. (See the note below for when the scan comes up empty.)
- Tick the checkbox next to each controller you want to add. The Endpoint (its IP address) and Identifier (its MAC address) are filled in for you.
- Give each controller a name and description, then click Add selected machines. GRBL Server connects to each one, reads its working area from the controller, and adds it to the machines table.
Network scan settings
The Wi-Fi network scan — and the WebSocket connection itself — is driven by a few values under Software Settings → Settings → SOCKET. The defaults suit most home and workshop networks; change them when your setup differs. Edits apply to the next scan, connection, or job, so there's no need to restart the server.
| Setting | Default | What it does |
|---|---|---|
| subnet | 192.168.1.0/24 |
The address range the scan sweeps, in CIDR notation. Set it to match your network — 192.168.0.0/24, 10.0.0.0/24, and so on. |
| port | 81 |
The WebSocket port GRBL Server uses to detect and talk to controllers. Must match the port your ESP32 firmware serves WebSocket on. |
| connect_timeout | 2 |
Seconds to wait for each address to answer before moving on. Raise it on slow or congested networks; lower it for a quicker scan. |
| max_concurrent | 200 |
How many addresses are probed at the same time. Lower it if a large scan strains the host or the network. |
Adding a TCP machine
The TCP transport talks to a controller over a plain network socket rather than a USB cable or the ESP32 WebSocket. It's how you reach a Smoothieboard on the network, a Klipper host through its Moonraker API, a ser2net bridge in front of a serial controller, or any firmware that exposes a telnet-style command port.
- Confirm the controller is reachable:
ping <host-ip>from the host, and check that its command port is open. - On the Manage Machines page, click Add Machine.
- Step 1 · Connection. Set Transport to
TCP. The Protocol picker offersSmoothieware(the default),Marlin,Klipper (Moonraker),GRBL, andGeneric G-code. - Step 2 · Connection parameters. Set the TCP port. It's pre-filled from the protocol you picked — Smoothieware uses
23(telnet), Klipper's Moonraker listens on7125, ser2net bridges are typically8888. Override it if yours differs. - Step 3 · Find your machines. TCP machines aren't auto-discovered, so type the host's IP address into the endpoint box and click Find by endpoint.
- Tick the machine, give it a name and description, then click Add selected machines.
Connection status indicators
The State column on the machines page is a connection and identity check, not the live motion state of the controller. It is refreshed when the machines page opens and when you click the refresh button in the D&R column.
Live controller states such as Idle, Run, Hold, and Alarm come from the controller's status reports in the Job station view and job logs. They are separate from the saved machine connection status shown here.
| Status | What it means |
|---|---|
| Connected | The registered controller can be found and its saved identifier still matches. For USB serial machines, GRBL Server looks for the saved USB serial number when one exists. For networked machines, it checks that the endpoint answers and that the identifier resolved for it still matches the saved one. |
| Disconnected | The registered controller could not be found during the check. For USB serial machines, no matching serial number or no-ID COM port was present. For networked machines, the endpoint did not respond. |
| Connected,No ID | A USB serial board is present on the configured COM port, but Windows did not provide a stable serial number. GRBL Server can talk to the port, but it cannot reliably distinguish that board from another no-ID device if ports move. |
| Connected,ID Mismatch | The endpoint is reachable, but the identifier does not match the saved machine. On networked machines this usually means the IP address now belongs to a different controller, or the controller board was replaced. |
Refreshing status
The button in the D&R column re-runs the connection check above and updates the saved status. It does not reset the controller. To open a live connection, use the Control button; to reset and reconnect, use the reset button inside the Control dialog.
Editing a machine
Click the EDIT button on the row to change the name, description, endpoint, or working area. Edits take effect immediately for new jobs. Jobs already running on the machine aren't affected.
Removing a machine
The red X at the right of each row removes the machine. Job records and workflow runs that referenced it stay in the database for historical reference, but new jobs can't target it any more.